Introduction
The Builder Design Pattern is a creational pattern that separates the construction of a complex object from its representation. In C#, it provides a way to construct objects step by step and produce different types and representations of an object using the same construction process. This pattern is particularly useful when dealing with complex object creation that involves multiple steps or configurations.
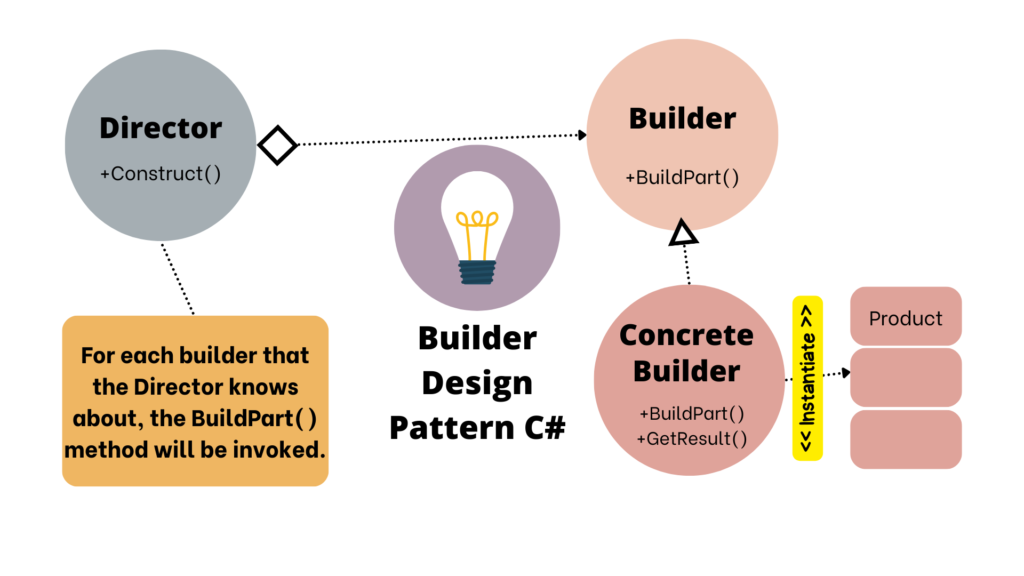
Table of Contents
Intent
The intent of the Builder Design Pattern is to encapsulate the construction process of an object and allow different representations or variations to be created using the same construction steps. It aims to provide a flexible and reusable way to construct complex objects without exposing their internal details.
Problem
In software development, there are scenarios where creating complex objects directly using a constructor or a single method call becomes cumbersome or leads to code duplication. For example, imagine a class with multiple properties, some of which are optional or have default values. Directly creating instances of such classes can result in constructors with many parameters, making the code hard to read and maintain.
Solution
The Builder Design Pattern addresses this problem by introducing a builder class that handles the step-by-step construction of an object. The builder class contains methods to set different attributes or configurations of the object, allowing for a more flexible and organized approach to object creation. Once all the desired attributes are set, the builder can build the final object.
Real-World Analogy
Think of a builder constructing a house. The builder follows a structured process, starting with laying the foundation, then erecting walls, adding utilities, and finishing with interior details. Each step in the construction process corresponds to setting specific attributes or configurations of the house. The builder can create different types of houses (e.g., modern, traditional) using the same construction process but varying the materials and design details.
Structure
The Builder Design Pattern consists of several key components:
- Product: Represents the complex object being constructed.
- Builder: Abstract interface or base class for concrete builders. Defines methods for setting object attributes.
- ConcreteBuilder: Implements the builder interface to provide specific construction steps for the product.
- Director (optional): Coordinates the construction steps by using a builder object.
Applicability
Use the Builder Design Pattern in C# when:
- You need to create complex objects with multiple optional or configurable attributes.
- The construction process of an object involves several steps or variations.
- You want to separate the construction logic from the final object representation.
- You need to create different representations of the same object using a common construction process.
How to Implement: Builder Design Pattern
Here’s a step-by-step guide to implementing the Builder Design Pattern in C#:
- Define the Product: Create a class representing the complex object to be built.
- Create the Builder Interface: Define an interface or abstract class that declares methods for setting object attributes.
- Implement Concrete Builders: Create concrete builder classes that implement the builder interface and provide specific construction steps.
- Optional: Create a Director (if needed): Define a director class to orchestrate the construction steps using a builder object.
- Client Code: Use the builder and optionally the director to construct objects by setting attributes step by step.
Pros and Cons
Pros:
- Separation of Concerns: Construction logic is separate from object representation.
- Flexibility: Allows for building different variations of objects using the same construction process.
- Readability: Improves code readability by breaking down object creation into logical steps.
- Reusability: Builders can be reused to create similar objects with different configurations.
Cons:
- Complexity: Introduces additional classes and interfaces, which can increase code complexity.
- Overhead: Requires defining builder classes and interfaces, which may not be necessary for simple object creation.
Here you can checkout our post on Singleton Design Pattern in C#: 6 Best Practices for Global Instance Management
Relations with Other Patterns
- Abstract Factory: The Builder pattern focuses on constructing complex objects step by step, while the Abstract Factory pattern deals with creating families of related or dependent objects.
- Prototype: The Builder pattern can be combined with the Prototype pattern to create complex objects where some parts are shared (prototype) and others are customized (builder).
Code Example 1
- Let’s illustrate the Builder Design Pattern with a simplified pizza making example in C#:
// Product
public class Pizza
{
    public string Dough { get; set; }
    public string Sauce { get; set; }
    public string Toppings { get; set; }

    public override string ToString()
    {
        return $"Pizza with {Dough} dough, {Sauce} sauce, and {Toppings} toppings.";
    }
}

// Builder Interface
public interface IPizzaBuilder
{
    void BuildDough();
    void BuildSauce();
    void BuildToppings();
    Pizza GetPizza();
}

// Concrete Builders
public class MargheritaPizzaBuilder : IPizzaBuilder
{
    private Pizza _pizza = new Pizza();

    public void BuildDough()
    {
        _pizza.Dough = "thin crust";
    }

    public void BuildSauce()
    {
        _pizza.Sauce = "tomato";
    }

    public void BuildToppings()
    {
        _pizza.Toppings = "cheese, basil";
    }

    public Pizza GetPizza()
    {
        return _pizza;
    }
}

// Director (Optional)
public class PizzaMaker
{
    private IPizzaBuilder _builder;

    public PizzaMaker(IPizzaBuilder builder)
    {
        _builder = builder;
    }

    public void MakePizza()
    {
        _builder.BuildDough();
        _builder.BuildSauce();
        _builder.BuildToppings();
    }
}

// Client Code
class Program
{
    static void Main(string[] args)
    {
        IPizzaBuilder builder = new MargheritaPizzaBuilder();
        PizzaMaker maker = new PizzaMaker(builder);

        maker.MakePizza();
        Pizza pizza = builder.GetPizza();

        Console.WriteLine(pizza.ToString());
    }
}
In this example, we have a Pizza class as the product, a IPizzaBuilder interface as the builder, a MargheritaPizzaBuilder as a concrete builder, and a PizzaMaker class (director) to orchestrate the construction steps. The client code creates a Margherita pizza by setting its attributes using the builder.
Code Example 2
Here’s a real-life example using a cake bakery to illustrate the Builder pattern:
- Define the Builder Interface: let’s build parts of a cake using an interface
ICakeBuilder.
public interface ICakeBuilder
{
    void BuildCakeBase();

    void AddFrosting();

    void AddToppings();
}- Implement Concrete Builders: Create concrete builders for different types of cakes, like
BirthdayCakeBuilderandWeddingCakeBuilder.
public class BirthdayCakeBuilder : ICakeBuilder
{
    private Cake _cake = new Cake();

    public void BuildCakeBase()
    {
        _cake.AddLayer("Vanilla Sponge");
    }

    public void AddFrosting()
    {
        _cake.AddFrosting("Buttercream");
    }

    public void AddToppings()
    {
        _cake.AddToppings("Sprinkles");
    }

    public Cake GetCake()
    {
        return _cake;
    }
}

public class WeddingCakeBuilder : ICakeBuilder
{
    private Cake _cake = new Cake();

    public void BuildCakeBase()
    {
        _cake.AddLayer("Almond Cake");
    }

    public void AddFrosting()
    {
        _cake.AddFrosting("Fondant");
    }

    public void AddToppings()
    {
        _cake.AddToppings("Edible Flowers");
    }

    public Cake GetCake()
    {
        return _cake;
    }
}- Define the Product: Create a
Cakeclass to represent the final product.
public class Cake
{
    private List<string> _layers = new List<string>();
    private string _frosting;
    private string _toppings;

    public void AddLayer(string layer)
    {
        _layers.Add(layer);
    }

    public void AddFrosting(string frosting)
    {
        _frosting = frosting;
    }

    public void AddToppings(string toppings)
    {
        _toppings = toppings;
    }

    public string GetCakeDetails()
    {
        return $"Layers: {_layers.Count}, Frosting: {_frosting}, Toppings: {_toppings}";
    }
}- Use the Director to Construct Cakes: Create a
CakeDirectorclass to guide the construction process.
public class CakeDirector
{
    private ICakeBuilder _builder;

    public CakeDirector(ICakeBuilder builder)
    {
        _builder = builder;
    }

    public void BuildCake()
    {
        _builder.BuildCakeBase();
        _builder.AddFrosting();
        _builder.AddToppings();
    }
}- Client Code: Use the pattern in your program to create different types of cakes.
class Program
{
    static void Main(string[] args)
    {
        var birthdayCakeBuilder = new BirthdayCakeBuilder();
        var weddingCakeBuilder = new WeddingCakeBuilder();

        var director = new CakeDirector(birthdayCakeBuilder);
        director.BuildCake();

        var birthdayCake = birthdayCakeBuilder.GetCake();
        Console.WriteLine("Birthday Cake:");
        Console.WriteLine(birthdayCake.GetCakeDetails());

        director = new CakeDirector(weddingCakeBuilder);
        director.BuildCake();

        var weddingCake = weddingCakeBuilder.GetCake();
        Console.WriteLine("Wedding Cake:");
        Console.WriteLine(weddingCake.GetCakeDetails());
    }
}
In this example, the Builder pattern helps to construct different types of cakes (products) using the same building process (methods in the builders). The Director (CakeDirector) guides the construction process, and the builders (BirthdayCakeBuilder, WeddingCakeBuilder) create specific types of cakes with customized properties.
Code Example 3
Let’s dive into a more complex and real-life example of the Builder Design Pattern in C#. Imagine you’re developing software for a car manufacturing company. The company produces various models of cars with customizable features. We’ll use the Builder pattern to create different types of cars with specific configurations.
- Define the Builder Interface: Create an interface
ICarBuilderto define the methods for building different parts of a car.
public interface ICarBuilder
{
    void BuildEngine();

    void BuildTransmission();

    void BuildInterior();

    void BuildExterior();

    void AddExtras();

    Car GetCar();
}
- Implement Concrete Builders: Develop concrete builders for different car models, such as
SedanBuilderandSUVBuilder.
public class SedanBuilder : ICarBuilder
{
    private Car _car = new Car("Sedan");

    public void BuildEngine()
    {
        _car.SetEngine("V6");
    }

    public void BuildTransmission()
    {
        _car.SetTransmission("Automatic");
    }

    public void BuildInterior()
    {
        _car.SetInterior("Leather");
    }

    public void BuildExterior()
    {
        _car.SetExterior("Metallic Paint");
    }

    public void AddExtras()
    {
        _car.AddExtras("Sunroof");
    }

    public Car GetCar()
    {
        return _car;
    }
}

public class SUVBuilder : ICarBuilder
{
    private Car _car = new Car("SUV");

    public void BuildEngine()
    {
        _car.SetEngine("V8");
    }

    public void BuildTransmission()
    {
        _car.SetTransmission("Automatic");
    }

    public void BuildInterior()
    {
        _car.SetInterior("Premium Leather");
    }

    public void BuildExterior()
    {
        _car.SetExterior("Off-road Package");
    }

    public void AddExtras()
    {
        _car.AddExtras("Tow Hitch");
    }

    public Car GetCar()
    {
        return _car;
    }
}
- Define the Product: Create a
Carclass to represent the final product.
public class Car
{
    private string _model;
    private string _engine;
    private string _transmission;
    private string _interior;
    private string _exterior;
    private List<string> _extras = new List<string>();

    public Car(string model)
    {
        _model = model;
    }

    public void SetEngine(string engine)
    {
        _engine = engine;
    }

    public void SetTransmission(string transmission)
    {
        _transmission = transmission;
    }

    public void SetInterior(string interior)
    {
        _interior = interior;
    }

    public void SetExterior(string exterior)
    {
        _exterior = exterior;
    }

    public void AddExtras(string extra)
    {
        _extras.Add(extra);
    }

    public string GetDetails()
    {
        return $"Model: {_model}, Engine: {_engine}, Transmission: {_transmission}, Interior: {_interior}, Exterior: {_exterior}, Extras: {_extras.Count}";
    }
}
- Use the Director to Construct Cars: Create a
CarDirectorclass to guide the construction process.
public class CarDirector
{
    private ICarBuilder _builder;

    public CarDirector(ICarBuilder builder)
    {
        _builder = builder;
    }

    public void BuildCar()
    {
        _builder.BuildEngine();
        _builder.BuildTransmission();
        _builder.BuildInterior();
        _builder.BuildExterior();
        _builder.AddExtras();
    }
}
- Client Code: Use the pattern in your program to create different types of cars.
class Program
{
    static void Main(string[] args)
    {
        var sedanBuilder = new SedanBuilder();
        var suvBuilder = new SUVBuilder();

        var director = new CarDirector(sedanBuilder);
        director.BuildCar();
        var sedan = sedanBuilder.GetCar();
        Console.WriteLine("Sedan Details:");
        Console.WriteLine(sedan.GetDetails());

        director = new CarDirector(suvBuilder);
        director.BuildCar();
        var suv = suvBuilder.GetCar();
        Console.WriteLine("\nSUV Details:");
        Console.WriteLine(suv.GetDetails());
    }
}
In this example, the Builder pattern is used to create different types of cars (products) with specific configurations. The client code demonstrates building a sedan and an SUV, each with its own set of features like engine type, transmission, interior, exterior, and extras. The output displays the details of each car type.
Conclusion
The Builder Design Pattern in C# offers a structured approach to construct complex objects while maintaining flexibility and reusability. By separating the construction process from the object representation, it helps improve code organization, readability, and maintenance. Understanding and applying this pattern can significantly enhance software design and development practices.
References
For more information and detailed references on the topics discussed in this article, please refer to the following link: